Hello! In this article I would like to show you how to create clustered Liferay environment. In my example environment I will use docker but the steps are similiar if you're installing two (or more) instances on one or many servers.
I will try to show you step by step how you can build the environment yourself so you can understand the process better. Of course if you want to you can go to the final version of code right away - it's on my git. I encourage you to go through the steps and learn something new though!
Important thing - I will focus on simplicity and on Liferay configuration so I will not create database/Elasticsearch/loadbalancer cluster. If you need those then it's quite simple to add that to the basic configuration I will show you and of course you will find tons of resources on these topics. Instead I will just show you the basic configuration for database/ElasticSearch and load balancer.
Prerequisites
To start you will need Docker installed on your local machine (or server or any other place where you want to start your cluster environment).
I won't go through the basics of containers or docker so it would be good if you knew the basics but I guess anyone can follow.
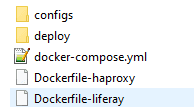
If you plan to create your environment while reading then you can also create a new directory with files/directories like on the screen below (the files can be empty at this stage):
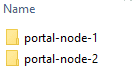
And in the deploy directory you can create two empty directories called "portal-node-1" and "portal-node-2":
Or you can check the GIT repository instead if you prefer to see the end result from the beginning.
Docker storage - mounting, volumes
After publishing the original post I thought about one more thing - in below instructions I use Docker volumes for holding some data (elasticsearch and Liferay's documents repository) and I mount some other (deploy directories) and I also copy some (configs, jars, portal-ext.properties) in Dockerfile. Also for the MySQL I don't save the data anywhere actually.
This approach gives you an overview of different methods you can use but there's a catch. If you plan to create production environment based on the instructions below then you should understand data storage in Docker first! I believe the best place for that is Docker documentation. It's really crucial as all types of data storage methods in Docker have their pros and cons.
Process of building the environment
Liferay containers
Since we want to have clustered Liferay environment we need two or more Liferay instances. I will go for two but it shouldn't be a problem for you to extend that number.
So how do we start? Well since we want to use docker compose we could create a simple docker-compose.yml file with description of two Liferay containers but I won't do that. Instead I will start with "Dockerfile-liferay" with following content:
FROM liferay/portal:7.0.6-ga7
MAINTAINER Rafal Pydyniak <[email protected]>

COPY ./configs/portal-ext.properties $LIFERAY_HOME/
COPY ./configs/\*.config $LIFERAY_HOME/osgi/configs/
COPY ./configs/\*.jar $LIFERAY_HOME/osgi/portal/
So basically we create our own image from existing one (official Liferay 7.0.6 GA7 image). In our version of image we copy portal-ext.properties to LIFERAY_HOME directory and also config files and some jars. We will need that later. Of course we could map our local disc to docker disc instead but since these files are not going to change we will do it this way. Perhaps the portal-ext.properties is an exception as it changes more often but I will leave it this way for now.
If you want you can test it now. To do that build that image, start it and then connect to the container to see if the files were indeed copied and the directory was created. Following commands will help us with that:
docker build -t my-liferay-7-tutorial -f Dockerfile-liferay . # builds the "Dockerfile-liferay". The created image will be "my-liferay-7-tutorial". The dot at the end is for pointing the context directory
docker run -d my-liferay-7-tutorial # we run our image
docker exec -it CONTAINER_NAME /bin/bash # we enter the container so we can test if everything is there. You can find the CONTAINER_NAME using docker container ls command
Use our images in docker-compose.yml
The next step is to create our Liferay containers (instances) definition in docker-compose.yml. The first scratch of the docker-compose.yml is below:
version: '3.3'
services:
  liferay-portal-node-1:
    build:
      context: .
      dockerfile: Dockerfile-liferay
    ports:
      - '6080:8080'
      - '21311:11311'
    hostname: liferay-portal-node-1.local
    volumes:
      - lfr-dl-volume:/opt/liferay/data/document_library
      - ./deploy/portal-node-1:/opt/liferay/deploy
    depends_on:
      - mysql
      - es-node-1
  liferay-portal-node-2:
    build:
      context: .
      dockerfile: Dockerfile-liferay
    ports:
      - '7080:8080'
      - '31311:11311'
    hostname: liferay-portal-node-2.local
    volumes:
      - lfr-dl-volume:/opt/liferay/data/document_library
      - ./deploy/portal-node-2:/opt/liferay/deploy
    depends_on:
      - mysql
      - liferay-portal-node-1
      - es-node-1
volumes:
  lfr-dl-volume:
So what we did there? Well we defined two instances of Liferay "liferay-portal-node-1" and "liferay-portal-node-2". We use our dockerfile we created before as the image and use current directory as a context path. We also expose ports from our container so they can be accessed outside the container. So we expose port 8080 to 6080 (node-1) and 7080 (node-2) and we also expose the gogo shell port.
Then we set the hostname so we can distinguish our instances and then we use volumes to do two things:
- persist the documents & media data to docker volume (defined at the end of the docker-compose). This way we have shared data directory between two instances as we use the same volume and that is what we need according to the documentation - all instances should share the same document library.
- map our local deploy/portal-node-X directory to the deploy directory of the container. This way we can easily deploy our modules
At the end we also define our volumes - for now it will only be "lfr-dl-volume".
You can also notice the "depends_on" fragment. This is just a declaration on what containers our container depends on. We define that so for example Liferay instance is not started before Elasticsearch or our Database which would result in errors. Of course we don't have Elasticsearch or mysql container defined yet but we will get to it soon.
Documents & data
It's important to add that for production purposes you might want to use "Advanced File System Store" data repository instead of the simple (default) one. In this case I used the default one and the default location to keep it simpler as changing that is not requirement for clustering (which is the main topic of this article). For more details about data repositories you can check this article.
Database configuration
For any Liferay environment we need a database (we don't want to use embedded H2). I won't go into too many details - the block for docker-compose.yml looks like that:
mysql:
    image: mysql:5.6
    environment:
      MYSQL_ROOT_PASSWORD: my-secret-pw
      MYSQL_DATABASE: lportal
    ports:
      - "33066:3306"
As you can see I'm using mysql but you can use any other database. You will easily find images on docker hub for example for postgres.
We also need a defined connection to our database. To do that we will use portal-ext.properties. You might remember that while creating our Liferay dockerfile we included a statement that copies our portal-ext.properties from configs directory to the server. This is the place we can add our database connection declaration. It will look like below:
jdbc.default.driverClassName=com.mysql.jdbc.Driver
jdbc.default.url=jdbc:mysql://mysql:3306/lportal
jdbc.default.username=root
jdbc.default.password=my-secret-pw
Of course you can also add your own properties like you would do in any other case. We will also add some more properties later when we get to cluster configuration.
Note: I actually don't store the mysql database data anywhere so it won't be persistent - if you remove the container (or use docker-compose down) the database data will be lost. To avoid that you can simply use volume (see elasticsearch config for reference) or create another directory and map it there like:
volumes:
- ./data/mysql:/var/lib/mysql
Elasticsearch configuration
One of the steps for clustering described in Liferay documentation is installing an instance of Elasticsearch. Since we're clustering we can't use the embedded one as all of our Liferay instances need to communicate with same Elasticsearch. In our case we want to use 2.4.6 version of Elasticsearch but in your case you might need another version - it all depends on the Liferay version you choose to use. You can refer to this article for informations how to find the correct Elasticsearch version for your Liferay.
After you find the Elasticsearch version that will work for you, you need to add it to your docker-compose.yml. In my case it looks like below:
es-node-1:
    image: elasticsearch:2.4.6-alpine
    environment:
      - cluster.name=elasticsearch
      - bootstrap.memory_lock=true
      - "ES_JAVA_OPTS=-Xms512m -Xmx512m"
    ulimits:
      memlock:
        soft: -1
        hard: -1
    volumes:
      - esdata1:/usr/share/elasticsearch/data
    ports:
      - 9200:9200
So again - first we define image we want to use. Then we have some additional configuration options which are either self explanatory (like memory args) or you can find their meaning in google (especially for ulimits). The only important setting connected directly to Liferay clustering is the "cluster.name" - this has to be something unique for your cluster environment but it can be any string. In our case it will be unique as our environment is quite simple but sometimes you might have for example DEV and TEST environment on same server and then you need unique cluster.name property to distinguish them.
You can also notice that we use "esdata1" docker volume so we need add its definition to the end of docker-compose. Our volumes definition will look like below:
volumes:
  lfr-dl-volume:
  esdata1:
Using remote elasticsearch in Liferay instances
Now that we configured our Elasticsearch server we need to actually use it in Liferay. To do that we will usage OSGI's configuration file. Lets create a file called "com.liferay.portal.search.elasticsearch.configuration.ElasticsearchConfiguration.config" in the "configs" directory. Then put the following content inside:
operationMode="REMOTE"
transportAddresses="es-node-1:9300"
clusterName="elasticsearch"
The code above just sets the Elasticsearch mode to REMOTE and sets the address and clusterName. You might wonder why we use "es-node-1" as host instead of something like "127.0.0.1" or "localhost". We do that because the services we define in docker-compose are in the same docker network and they're reachable by other containers by their container name. The binding is handled by the docker itself - it basically adds required entries in /etc/hosts and the container name is just an alias there.
Also note that the "clusterName" must correspond to the name you defined in Elasticsearch service definition.
We don't need to do anything else because in the Dockerfile we declared before we already copy all .config files to LIFERAY_HOME/osgi/configs directory.
Using "multiple" version of bundles
In Liferay 7.0 CE which we use in this article we need to do another step described there. Basically this version by default is not ready to be run in clustered mode because it only contains "non-clustered" version of three modules:
- com.liferay.portal.cache.single
- com.liferay.portal.cluster.single
- com.liferay.portal.scheduler.single
We need to disable them and instead use the "multiple" versions of these. The article linked above describes the steps for obtaining (compiling) them so I won't go into too many details here. I will just describe what to do with them once you get them.
Note: if you use the 7.0.6 version of Liferay you can just get these from the git repository for this article.
Note2: you might not need that step at all if your version already supports multiple module versions. This is true if you use DXP version or if you use newer version of Liferay - just run the gogo shell command in your Liferay "lb portal.scheduler" and see if there is enabled module called "Liferay Portal Scheduler Multiple" - if yes then you don't need to do that step
Once you have your multiple modules you need to:
- deploy them - just put them in "configs" directory
- ignore the .single version modules - to do that create new file called "com.liferay.portal.bundle.blacklist.internal.BundleBlacklistConfiguration.config" in configs directory with following content:
blacklistBundleSymbolicNames="com.liferay.portal.cache.single,com.liferay.portal.cluster.single,com.liferay.portal.scheduler.single"
The Dockerfile-Liferay we defined before will do the rest i.e. copy them to approriate directories.
Enabling the cluster mode
We are almost done but we still didn't tell Liferay that we want to use clustered environment. How do we do that? Well it's quite simple actually - all we need is to add following line into our portal-ext.properties:
cluster.link.enabled=true
But hey - is that that simple? Well actually it is - at least in some cases. Basically this property makes Liferay to use JGroups channel to communicate with each other on default ips and ports using UDP multicast connection. Therefore it will only work if the Liferay instances are able to communicate with each other through multicast - this is not always the case. Even if you have servers on the same subnet this still might not work as for example Azure doesn't support multicast in virtual networks and they're not planning to add (last time I checked). In our case it will work though as we use docker-compose on one machine and docker will provide multicast connection. If you need other solutions then you can check Liferay documentation where other method is described (unicast over TCP).
For our environment this is enough though. We don't need to do anything else but you might also want to add one more property:
web.server.display.node=true
This will add displaying a message with current Liferay's node. This is useful for testing purposes so I encourage you to do that. Of course you might want to add other properties you need.
You might want to check the Liferay docs to read how exactly the JGroup communication works. The idea is quite simple and clever and it should take you just a couple of minutes to read that and understand the basics.
Load balancing
Initial note
Please note that this step is totally optional. You might already have a load balancer or HTTP server (like Apache or Nginx) installed on your server and then you can't declare another one here and instead you should do the load balancing in your current application or ask your server admistrator to do that for you. If you want (or need) to do it by yourself you can always google it like "Load balancing Apache2" or "Load balancing HAProxy" etc. You can also follow steps below for HAProxy configuration on docker but the steps are similiar if you have it installed as a regular service.
Important you need to have sticky session in your load balancer. This is important as session is by default not shared between cluster nodes so if the user gets redirected to another node he will be logged out. This might be an issue if you use Nginx (which is really popular) as by default sticky sesions are available only in paid version of the app as far as I'm concerned.
Docker config
So the last thing we need is load balancing between our servers. We obviously don't want user to pick the server he wants to enter himself. Instead we want to have one url like app.pydyniak.com (nothing there so you don't need to check :)) which picks one of the servers automatically. The digram below shows the basic idea: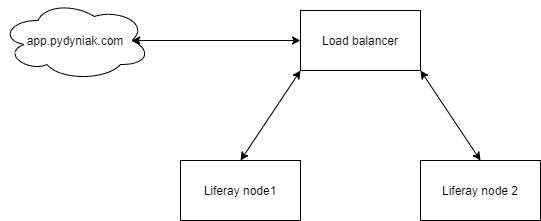
So first we want to build another Dockerfile. Lets call it "Dockerfile-haproxy" and copy the content inside:
FROM haproxy:2.3.4
COPY ./configs/haproxy.cfg /usr/local/etc/haproxy/haproxy.cfg
There is nothing special in this code. We just copy our config file to HAProxy and this is actually the recommended way shown on Docker Hub. Now lets define our service in docker-compose.yml:
haproxy:
    build:
      context: .
      dockerfile: Dockerfile-haproxy
    ports:
      - '80:80'
    hostname: lb-haproxy.local
We point to our dockerfile and use the current directory as context. We also expose required port and set hostname. I believe it's quite clear.
We also need to fill the haproxy.cfg file we defined in our Dockerfile so we create "haproxy.cfg" inside configs directory and use following configuration:
global
   stats timeout 30s
   daemon

defaults
   log global
   mode http
   option httplog
   option dontlognull
   timeout connect 5000
   timeout client 50000
   timeout server 50000

frontend http_front
   bind 0.0.0.0:80
   default_backend http_back

backend http_back
   balance roundrobin
   cookie JSESSIONID prefix
   server liferay-portal-node-1 liferay-portal-node-1:8080 check cookie s1
   server liferay-portal-node-2 liferay-portal-node-2:8080 check cookie s2
This is quite a long configuration but what is important is that it does what we wanted. The highlighted lines are the core ones. Basically in these line we do two things:
- Set the mode to roundrobin - it's just one of "ways" of distributing traffic between servers. You will easily find that on Wikipedia for example
- Define the servers available int he cluster and also implementing "sticky session". Sticky session means that if an user enters the site and for example enters the NODE2 he will stay on the same node for the whole session. This is required as the session is not shared between nodes. To understand better how exactly the sticky session is handled you can check this article on HAProxy site
Lets run our Liferay clustered environment
Finally we're done. We defined everything we need and I hope you understand why we did what we did. Now we need to start the environment. We can do that by executing following commands:
docker-compose build
docker-compose up -d liferay-portal-node-1
# wait until it starts. You can also check docker-compose logs to validate that
docker-compose up -d liferay-portal-node-2
docker-compose up -d haproxy
During start of the servers we can see in logs (docker-compose logs) that indeed the nodes connect to each other. You can look for message like below:
liferay-portal-node-1_1  | 2021-01-24 23:10:59.862 INFO  [Incoming-2,liferay-channel-control,liferay-portal-node-1-3920][JGroupsReceiver:90] Accepted view [liferay-portal-node-1-3920|1] (2) [liferay-portal-node-1-3920, liferay-portal-node-2-36188]
liferay-portal-node-1_1  | 2021-01-24 23:11:00.057 INFO  [Incoming-2,liferay-channel-transport-0,liferay-portal-node-1-47303][JGroupsReceiver:90] Accepted view [liferay-portal-node-1-47303|1] (2) [liferay-portal-node-1-47303, liferay-portal-node-2-30594]
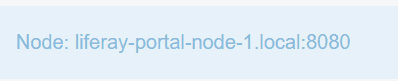
If you then enter the server on :80 port you will see that you've been connected to one or two nodes (of course if you added property for displaying that message):
You can also try to connect to the same server from different browser - you will most likely get connected to the second node - if that's the case then congratulations. You can't tell right away that everything works because we only know that:
- In theory the connection works between nodes looking at the logs
- The HAProxy seems to be working - you can also verify the cookie to see that indeed we have server information there
But in real case scenario you would need to perform some more tests:
- If the elasticsearch works - if you add some content on node1, can you search for it on node2?
- Does the connection indeed works? If you add some content on node2, can you see that content on node1?
- Are the documents & media shared? If you add some document on one of the nodes, can you see it on another one?
- If you stop one of the nodes, is everything fine?
And of course you might come with your own tests you would like to perform especially if that's the production server.
Performance
One thing you might notice is that the servers are not too fast. That's because we didn't set memory settings. The simplest way to do that is probably to create configs/setenv.sh. Inside that file you would need to tune the memory settings (override default content). Then you would need to add a COPY in your Dockerfile-liferay. You need to copy that to /opt/liferay/tomcat-8.0.32/bin/ ($LIFERAY_HOME/tomcat-8.0.32/bin/). You can check the git repository where I added that. Please note that you might also need to change the memory settings for your docker so it has enough memory (and CPU).
Conclusion
I hope the article was clear enough. The article was quite long but mostly because I tried to explain a little bit why I did things the way I did. The docker project for that environment is quite small though and you can of course check that on git. In this article I did cluster on 7.0.6 but steps are pretty much the same for newer versions so if you need for example 7.3 then you will probably just do some changes in Dockerfile-Liferay and that should be enough.
If you have any questions feel free to ask either in comments or by contacting me.