Hello! Today I would like to show you how to use Jenkins for continuous integration (CI) and continuous code quality inspection using SonarQube.
I decided to write this post because some time ago I had to make such process for project I work on and I couldn't find any help regarding Liferay and I had some problems with that, especially with setting SonarQube properly for Liferay workspace
Prerequisites
First we need few things:
- Liferay Project - for this case I created a simple project which you can also use. It contains just a few classes and modules but is more than enough to show the basic concept. You can find it on my github
- Jenkins
- SonarQube
Jenkins
Lets start with Jenkins. In case you never heard of Jenkins it's an open source automation server. It's often used with code-related automation process such as building, running tests and deploying application but you can as well use it for other things such as running some application periodically for example.
To install Jenkins you should check this installing instruction site. You can install it either on your machine or using Docker. I suggest you the latter as I'm Docker fan myself but the instructions are the same either way so pick yourself :)
SonarQube
The second tool we need is SonarQube which is an open source tool for performing automatic code quality checks. It can detect code smells, bugs, duplicated code and things like that. I'll show you SonarQube later on when we'll start configuring things. The instructions for installating the SonarQube are on its official site. Again you can pick between Docker or standard installation way.
Integration
Now when we have fulfilled requirements we can start the configuration of integration between our Jenkins, SonarQube and our project.
Basically what we want to do now:
- Configure the project in SonarQube
- Add SonarQube Scanner plugin to Jenkins
- Configure the SonarQube scanner plugin
- Create a new Jenkins project for building our project and scanning with SonarQube
Configure the project in SonarQube
Before we start an integration we need to create SonarQube project. To do that we go to our SonarQube server (if installed locally it's most likely under localhost:9000), we log in (default credentials are admin/admin) and click "Add" button in top right corner
 Then we have to generate our token - we simply enter some name and click "Generate". The token is generated for us and we can use it from other application (such as Jenkins) to connect to SonarQube.
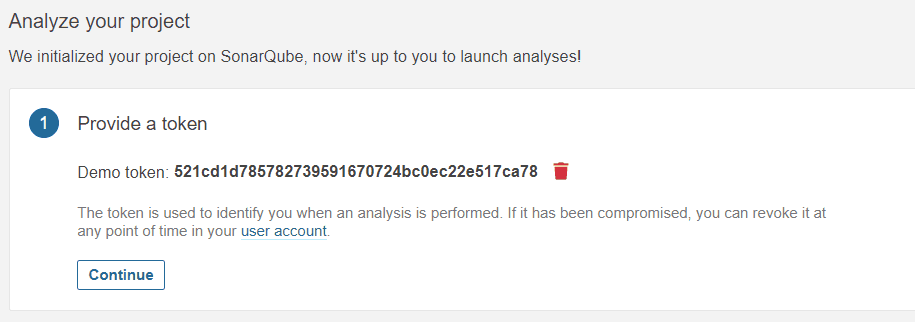
We save the token and the project name as we need that later. If you click continue you can see the example of how to use SonarQube from Gradle or Maven but we won't need that.
Add SonarQube scanner plugin to Jenkins and configure it
In order to integrate with SonarQube we need a "SonarQube Scanner" plugin. We can install it by going to (from dashboard):
Manage Jenkins -> Manage plugins -> Available -> Search for "SonarQube Scanner" -> check the first one and click "Install with restart"
Then, after we install the plugin, we go to (from dashboard):
Manage Jenkins -> Global tool Configuration -> Under "SonarQube Scanner" we click "Add SonarQube Scanner", name it somehow and just leave the other, default options. We then click "Save"

After we add SonarQube Scanner we also need to configure our SonarQube server. To do that we go to (from dashboard):
Manage Jenkins -> Configure System -> We look for "SonarQube servers" and we click "Add SonarQube". We name it, provide URL
Create Jenkins project (task)
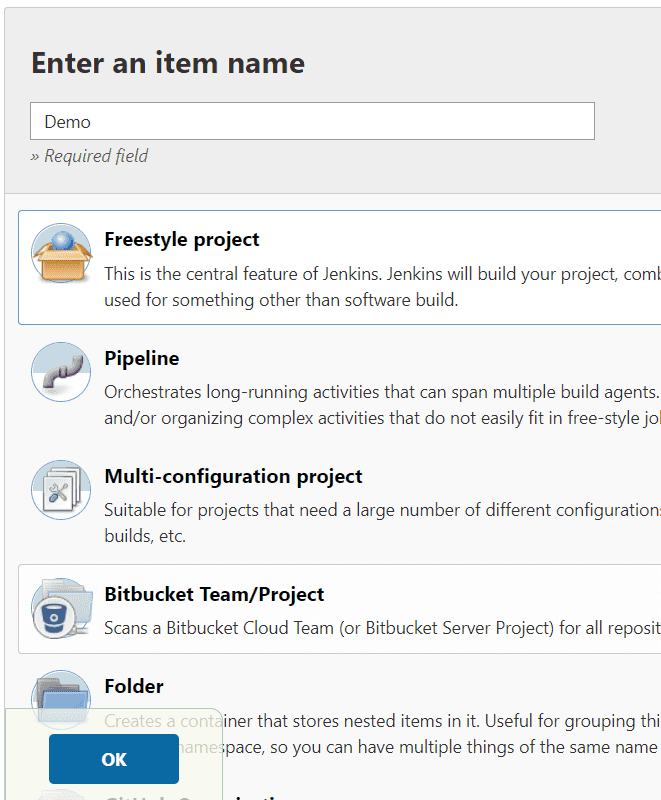
In Jenkins we have several types of projects. What we want is the basic "Freestyle project" which basically a type of task where we can put different stuff together (like build, test, deploy etc). We create it by just using "New item" from dashboard and selecting "Freestyle project", giving it a name and just click ok.
After we click ok, a newly created task setting site should appear. We won't go through all of the settings because there are many of them and most of them are for quite specific use cases. Fortunately we can click on question mark next to each field and a see a help message for the field.
When you create a new Jenkins task you should first define what exactly you want to do. In our case we want to:
- Pull code from remote repository - this will be git in my example but you can also other like SVN
- When we have our code we want to build it using gradle
- Then we scan our code with SonarQube
In this example that's all. Usually you also want to run tests or go even further and automatically deploy the application to your server (Continious deployment) to have full CI/CD process but for now we'll just stick with continiuous builds and code check
Pull code from repository
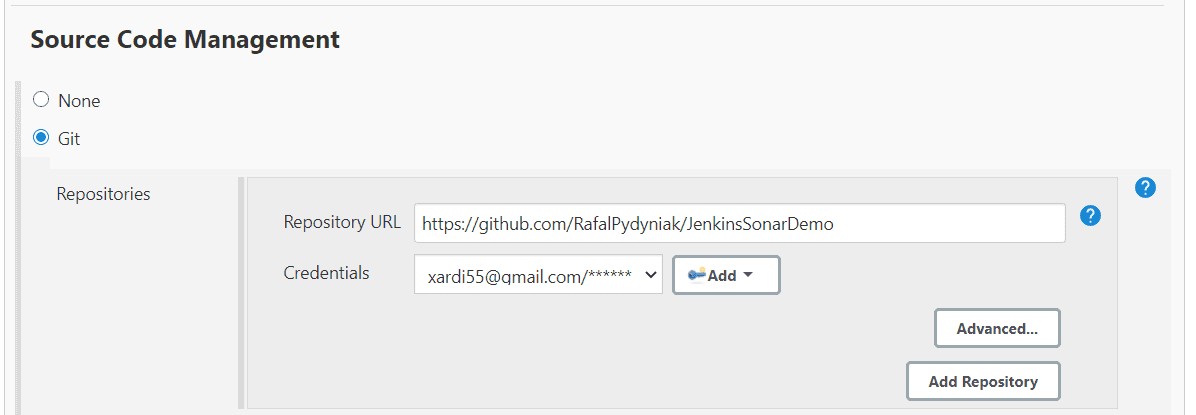
To automatically pull code from our repository we go to "Source Code Management" section. Then we pick the system we want to use. In my case this will be Git. We also need to provide credentials - we can do that by clicking add (assuming we're doing that for the first time) and selecting "Jenkins". In new panel we provide username and password and click add. The credentials will be saved and we'll be able to reuse them with other tasks. When we finish it should like on the screen below:
Build our application
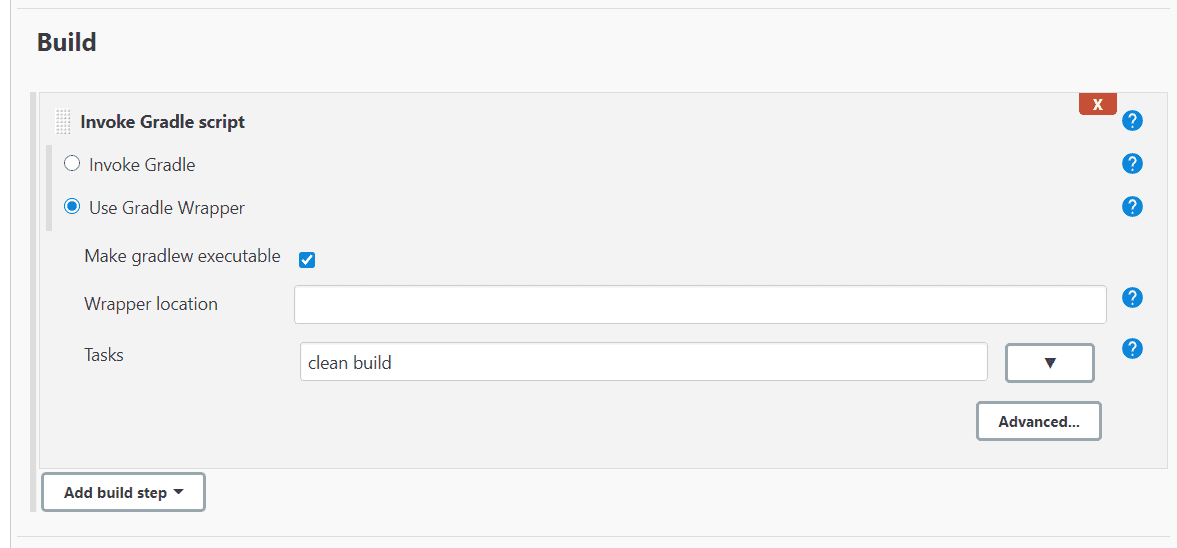
Now we go to "Build" section. In this section we can add one or more steps for our task. The step can be for example running Gradle, invoke Ant, run shell (or windows cmd) command etc. In our case we pick "Invoke gradle". We can either choose a version we want to use (these can be configured in Jenkins settings) or use Gradle Wrapper. Using gradle wrapper is recommended way of using gradle so we'll pick that option. We check the "Make gradlew executable" (it basically does something like chmod +x ./gradlew) and in task section we put our build task
clean build
Scan our code with SonarQube
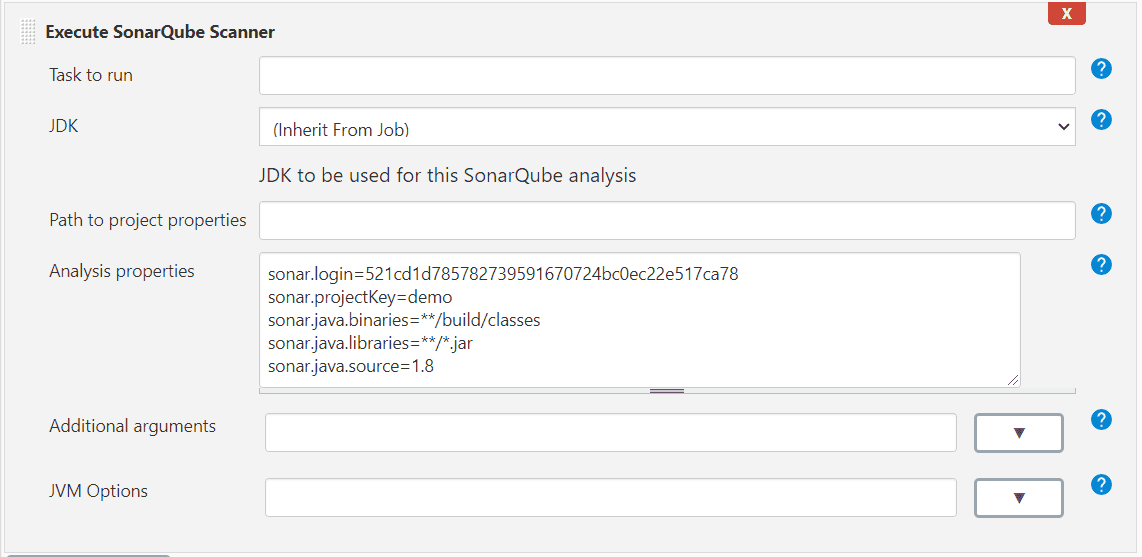
We have our code built. Assuming it builds properly we want to call the SonarQube now. To do that we add another build step by clicking "Add build step" just under our gradle step. We then pick "Execute SonarQube Scanner". In "Analysis properties" we need to provide informations for SonarQube scanner so it knows how to scan our project. There are many settings we can use and you can find them all in Sonar documentation but the properties we're going to need are:
- sonar.login - token you have generated in SonarQube (see "Configure the project in SonarQube" section)
- sonar.projectKey - projectKey you entered when you created your project
- sonar.java.binaries - you specifiy location of your project binaries
- sonar.java.libraries - if they are extra libraries you should put their location so Sonar can use them while scanning
- sonar.java.source - source version of your project
Check the screen below for the default values - they should work also for you unless you have some specific paths or requirements
Lets test it!
Run Jenkins build we created
Finally we have it all to run our task for the first time. After we save our Jenkins task we can run it by clicking "Build now" (if we're on dashboard we have to enter the task by clicking on its name first).
We wait for a little bit. After all we should see a task number with blue dot under build history indicating that everything went ok:
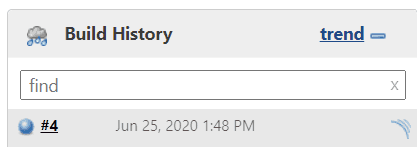
In build history you can check see your previous builds (you can see mine is already #4 - previous 3 failed but hopefully if you follow the tutorial it will work for you at the first time! ;) ). You can also click on the number to go into specific build history entry where you can for example check console output (really useful if your task fails!).
Check the result in SonarQube
Lets go to our SonarQube project and see the result. If you're on SonarQube main page you can go to "Projects" and enter the project you've created by clicking on its name.
Note**:** Sometimes you might need to wait a while. Jenkins task sends the data to SonarQube and finishes but SonarQube need a while to process the data. For big projects there is usally a small delay between Jenkins task finishes and the results are available.
When you enter your project you can see summary for your project:
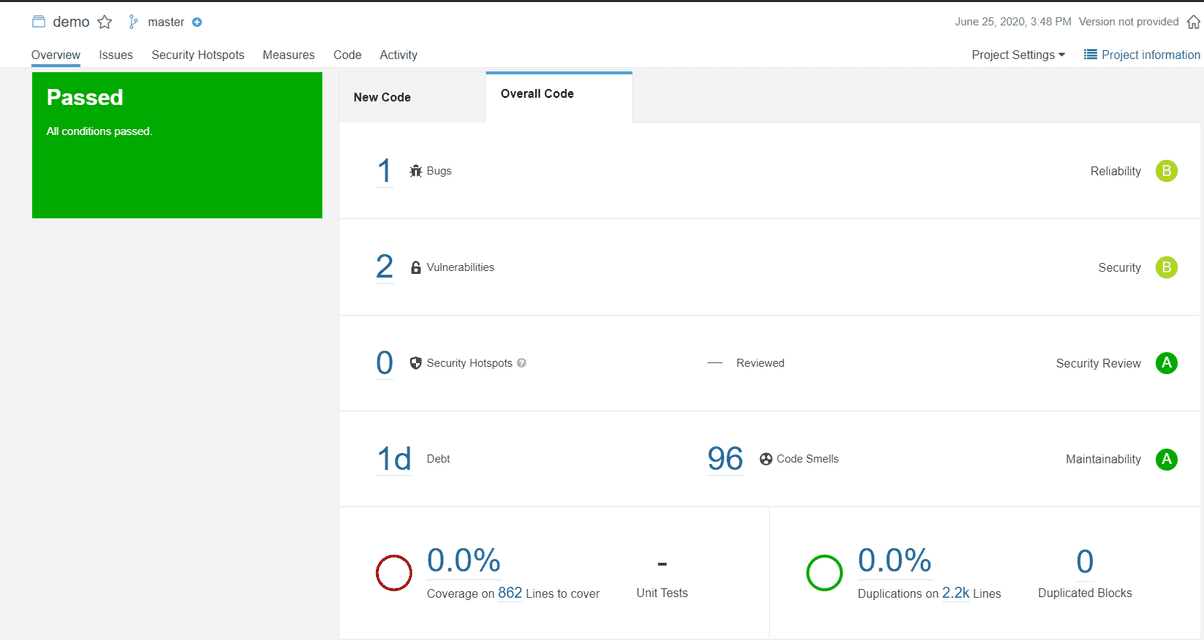
There are tabs:
- New code - it shows summary only for new code
- Overall code - summary for whole codebase
The difference is that if you have an error that exists for a year then it will only be counted in "Overall code" but not in new code. That helps especially when you start scanning an existing code - usually you have a lot of bugs already and you don't want to fix them right away so you can just start by making sure that new code is good enough.
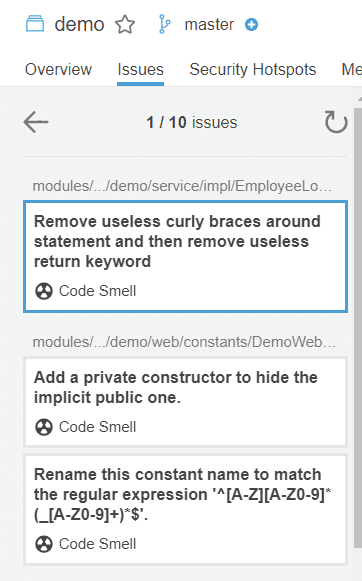
Another useful tab is "Issues". It shows the issues in the code - probably the most important tab. You can check every bug Sonar finds in your code. You can also filter by severity, type, date and many other things. What is also cool about this is that you can assign an issue to someone so from Sonar you can manage the people assigned to certain errors. You might also change type, severity or add a comment. What is also important is that you can also mark issue as fixed, false positive or won't fix - this is really helpful in some scenarios since SonarQube is just a tool and makes mistakes.
Problem with Liferay service builder code
If you looked through your SonarQube issues you probably noticed one problem - there are a lot of bugs. Is your code that bad? Well maybe but there is also one more explanation - auto generated code from service builder. In my case my test project has only three classes where I put code any yet I have almost 100 errors which is quite a lot (even though I made some mistake on purpose for this demo). And that's just from one entity in my Service Builder.
We could of course mark these bug as "false positive" or "won't fix" but lets imagine a real project - number of these bugs would be just too high. I myself worked on a project which had around 150 entities in service builder and probably your project might have much more.
Fortunately there is another way. We can tell Jenkins to ignore some paths from scanning with sonar.exclusions property. With this property you can select the paths you want to ignore. This seems easy but there are actually two problems:
- If you use Liferay 7 you probably have well modularized project (or you should have!) with OSGI. That means you can't simply put one path for your services because you might have as well have 15 modules with services
- We have auto generated code in *-api but also in *-service. You probably could ignore whole *-api modules in most cases but in *-service there is some of the auto generated code and some of your code (in *impl classes)
And I can think of two solutions:
- For small projects, perhaps you don't have that much modules - you could simply point to proper modules and for -service to directories in that module that should be ignored
- Think about some "general" rule which would apply in your case
General exclusion rule
I picked the second option for this blog post but also in my real life project so I can say it works quite well. The property is:
sonar.exclusions=**/build/resources/main/META-INF/resources/**/*.jsp,**/*-service/**/model/impl/**/*.java,**/*-service/**/service/persistence/**/**/*.java,**/*-service/**/service/base/**/*.java,**/*-service/**/service/http/**/*.java,**/*-service/**/service/util/**/*.java,**/*-api/**/dto/**/*.java,**/*-api/**/exception/**/*.java,**/*-api/**/model/**/*.java,**/*-api/**/service/**/*.java
As you can see you can separate the entries with comma. You can also use:
- * - to ignore on or more character in file name
- ** - to ignore one or more directories
So this property basically ignores auto generated classes in both -service and -api modules of service builder. There is one problem though. This property makes some assumptions about naming in your project. For example it ignores **/*-service/**/service/util/**/* but what if you had your own module called for example blogs-service and inside you had a directory service/util? Well then this would be ignored then.
Unfortunately in this case you have to tune the general rule or just pick the option "a" and point to directories you want to exclude yourself. In most cases though that should work for you "as is".
Another test
When you put this extra property it should look much better for you. In my case out of 100 errors I have only 10 left which is great. And these ten are the real bugs or rather code smells I have in my code. But what is also important - the one error in *LocalServiceImpl is still there so we didn't accidentally ignored that class with property we added.
Summary
To sum up - we have created a Jenkins job that runs the build of our project and sends the result to SonarQube. On SonarQube page we can see the result of our code quality check i.e. issues in our codebase such as security hotspots, vulnerabilities, code smells and others.
In this tutorial I didn't touch the topic of build triggers (see "Build Triggers" section in Jenkins task configuration) but you probably want one of these. This allows you to automatically run the task whenever something change in your GIT (or other) repository. There are different ways of doing that but you can read a lot regarding this topic on other sites or blogs so I left. You can also check other options in task configuration but like I said before - most of them have some specific use cases and you'll probably not need most of them at least for now.
The next step in our automation process could be automatic unit tests running or automatic deployment of your application to the server. You could also send an email for failed builds (see post-build actions in task configuration) or perhaps do something else specific to your company process.
With Jenkins you can do quite a lot so I encourage you to try it out and see what options it can give you. Keep in mind that there are also plugins that can help you integrate with different stuff you might want to use.
Hope you found that useful and see you. And remember - if you had any questions you can always write a comment or contact me.